Windows 7 machines are awful about telling you, quickly and simply, if you are connected to a good wifi signal or not; if your wifi is on or not; if you have Bluetooth capability or not. I have four Windows 7 laptops, and most of them have a function key that turns wifi on and off, but looks like a Bluetooth symbol. One of the laptops has a function key that turns both wifi AND Bluetooth on and off. For all my machines, if the function key has been used to turn off wifi or Bluetooth -- then it's impossible to turn wifi or Bluetooth on any other way, such as through Windows.
It's ridiculous. It should be far easier to figure out if wifi or Bluetooth are available on a machine, and if they are turned on or off. It should also be FAR easier to select a wired Ethernet connection for internet access, or a wifi connection.
On to my recent experience. I pulled out one of my dusty Bluetooth keyboards (a Motorola keyboard, designed to be used with Android phones). I spent a good 30 minutes trying to pair the damn thing with Windows the usual way:
from https://support.microsoft.com/en-us/help/15290/windows-connect-bluetooth-device
- Turn on your Bluetooth device and make it discoverable.
The way you make it discoverable depends on the device. Check the device or visit the manufacturer's website to learn how. - Select the Start button > Devices and Printers.
- Select Add a device > select the device > Next.
- Follow any other instructions that might appear. Otherwise, you're done and connected.
Right.
As usual, the instructions from Microsoft did not work. I continually got a window that looked like this, but the window flashed by in an instant, too quickly for me to enter the code shown, and then I'd get an error message. I tried the above directions about a dozen times, and even pulled out a Samsung keyboard and tried it. The other options in similar-looking windows that appeared did not work either. I even progressed to the point where I was allowed to enter a pairing code, but the Windows machine never showed what I was typing on the keyboard.
I've previously added and used Bluetooth keyboards on Macs, iPads, and another Windows 7 machine, so I knew that it could be done.
After numerous attempts, I discovered a site that gave an alternative method:
https://www.wayneandlayne.com/blog/2010/06/14/bluetooth-keyboard-pairing-without-code-entry/
Here's what they suggested, and this worked easily:
In short, instead of following the usual pairing instructions, right-click on your device and select Properties. Check the box for drivers, and the driver should download. After that, your keyboard should work with your Windows 7 machine, no pairing needed!
Here's the instructions from the website:
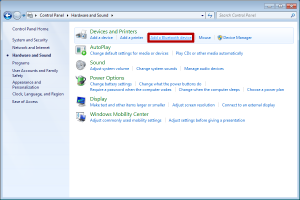
To start, open up the Control Panel, and go to “Hardware and Sound”. Select “Add a Bluetooth device”:

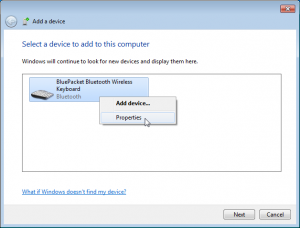
When Windows is searching for your Bluetooth devices, put your keyboard into pairing mode (press the button). When it shows up in the list, don’t double click it! Instead, right-click on the keyboard device and select “Properties”:

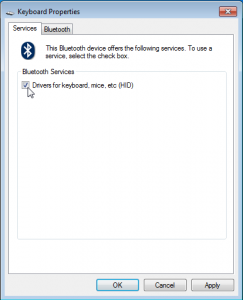
In the window that opens, “Keyboard Properties”, wait a couple seconds for the services panel to load. Once it has loaded, check the box for “Drivers for keyboard, mice, etc. (HID)”. Click on “OK” to close the window.

Windows will load the drivers for your keyboard. After everything settles down, your keyboard should be working with Windows. Try typing characters into Notepad, to make sure it’s working properly. Congratulations!
*****
I also discovered another website that gives similar instructions on how to connect a BT keyboard without pairing:
https://www.raymond.cc/blog/how-to-install-bluetooth-keyboard-on-windows-7/
1. Right click on the Bluetooth icon at notification area and select “Add a Device”.
2. If the keyboard is not discoverable, press and hold the Bluetooth Connect button located at the back of the keyboard.
3. When the keyboard is found, right click on the keyboard and select Properties.

4. There will be a checkbox “Drivers for keyboard, mice, etc (HID)” under Bluetooth Services. Check it and click the Apply button. Wait for the installation to complete and then only click the OK button to close the window.
Read More: https://www.raymond.cc/blog/how-to-install-bluetooth-keyboard-on-windows-7/
I had the same problems as this website describes!
Here are some of the problems which I’ve encountered when trying to connect a bluetooth keyboard to Windows 7. The Bluetooth keyboard is discoverable but then fails to connect with the error “Adding this device to this computer failed” with two different error messages:
Adding the device failed resulting in an unknown error. The reported error code is: 0x80004005. Contact your device manufacturer for assistanceand…
It took too long to add this device. Devices usually stay in discovery mode for only a short period of time to prevent power drain. Try adding the device again.
Read More: https://www.raymond.cc/blog/how-to-install-bluetooth-keyboard-on-windows-7/


